Let's build a P2S VPN to connect on-prem environment to Azure Virtual Network
-
date_range 06/02/2023 15:00 infosortHandsOnlabelPostgreSQLMySQLVPN
Why you need a P2S VPN
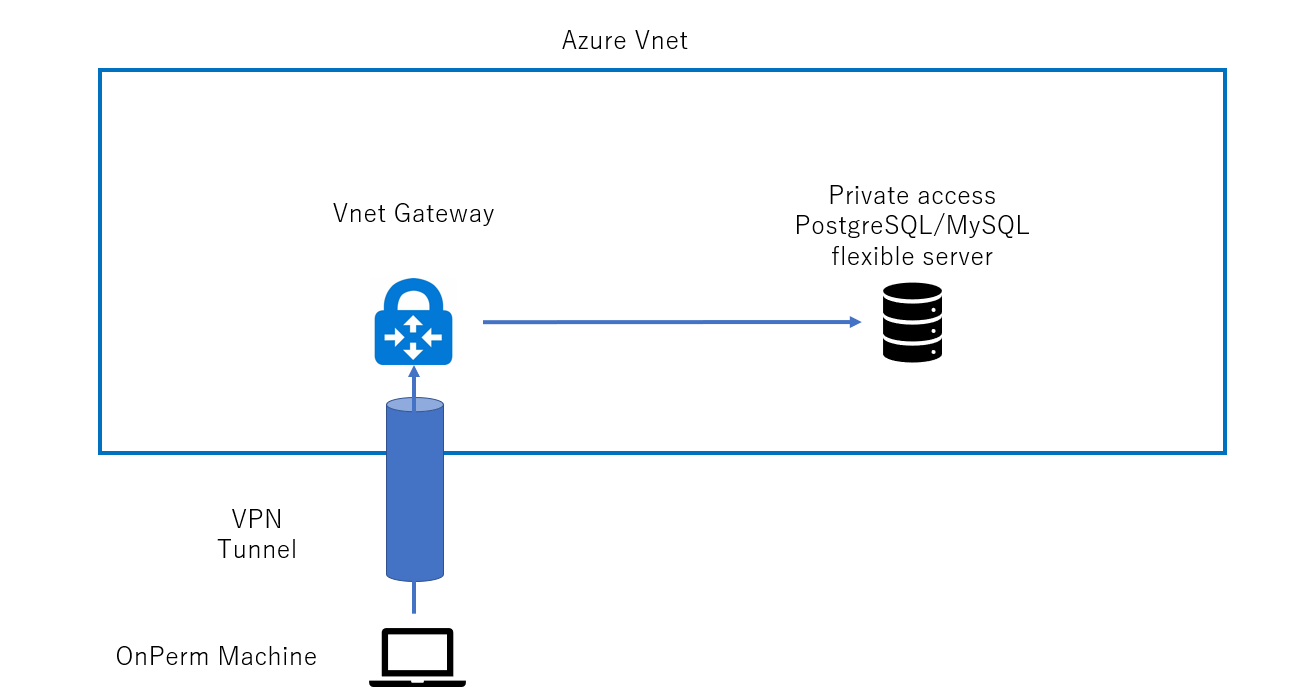
Azure Virtual Network disables connections from the Internet in order to provide better security and isolation. So when you try to connect from your laptop to a resource that exists in an Azure Virtual Network such as a private access PostgreSQL/MySQL Flexible Server, the connection will fail.
A Point-to-Site (P2S) VPN lets you create a secure connection to your virtual network from an individual client computer. A P2S connection is established by starting it from the client computer. This solution is useful for telecommuters who want to connect to Azure VNets from a remote location, such as from home or a conference. However, when you have many clients that need access to the Azure Virtual Network, use S2S VPN instead of P2S VPN

You can find more information about P2S VPN at here.
Let’s ROCK!
Create a new subnet in your vnet
az network vnet subnet create --name gatewaySubnet --vnet-name <your-vent-name> --resource-group <your-RG> --address-prefixes <your-ip-range>Create a public IP address
az network public-ip create --name gatewayIp --resource-group <your-RG>Create a new VPN gateway
az network vnet-gateway create --name handsOnGateway --resource-group <your-RG> --vnet <your-vent-name> --public-ip-address gatewayIp --gateway-type Vpn --vpn-type RouteBasedCreate a root certificate
Open PowerShell on your laptop and run this command.
$cert = New-SelfSignedCertificate -Type Custom -KeySpec Signature `
-Subject "CN=P2SRootCert" -KeyExportPolicy Exportable `
-HashAlgorithm sha256 -KeyLength 2048 `
-CertStoreLocation "Cert:\CurrentUser\My" -KeyUsageProperty Sign -KeyUsage CertSign
Generate a client certificate
New-SelfSignedCertificate -Type Custom -DnsName P2SChildCert -KeySpec Signature `
-Subject "CN=P2SChildCert" -KeyExportPolicy Exportable `
-HashAlgorithm sha256 -KeyLength 2048 `
-CertStoreLocation "Cert:\CurrentUser\My" `
-Signer $cert -TextExtension @("2.5.29.37={text}1.3.6.1.5.5.7.3.2")
Export the public key
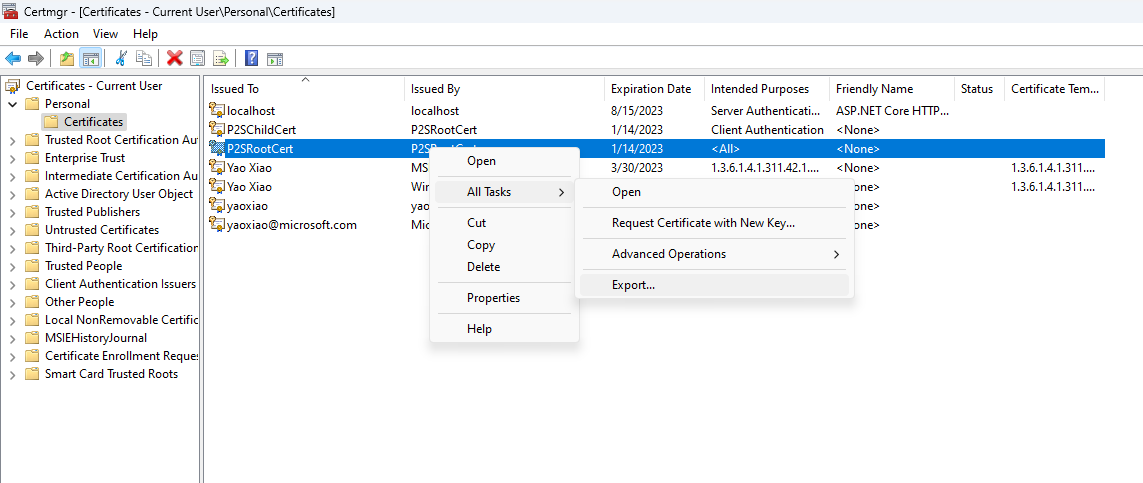
Press win + R and run ‘Certmgr.msc’. Find your root certificate and export it.

In the wizard,
- click Next.
- Select No, do not export the private key, and then click Next.
- For File to Export, Browse to the location to which you want to export the certificate. For File name, name the certificate file. Then, click Next.
- Click Finish to export the certificate.
Configure a new P2S via Azure portal
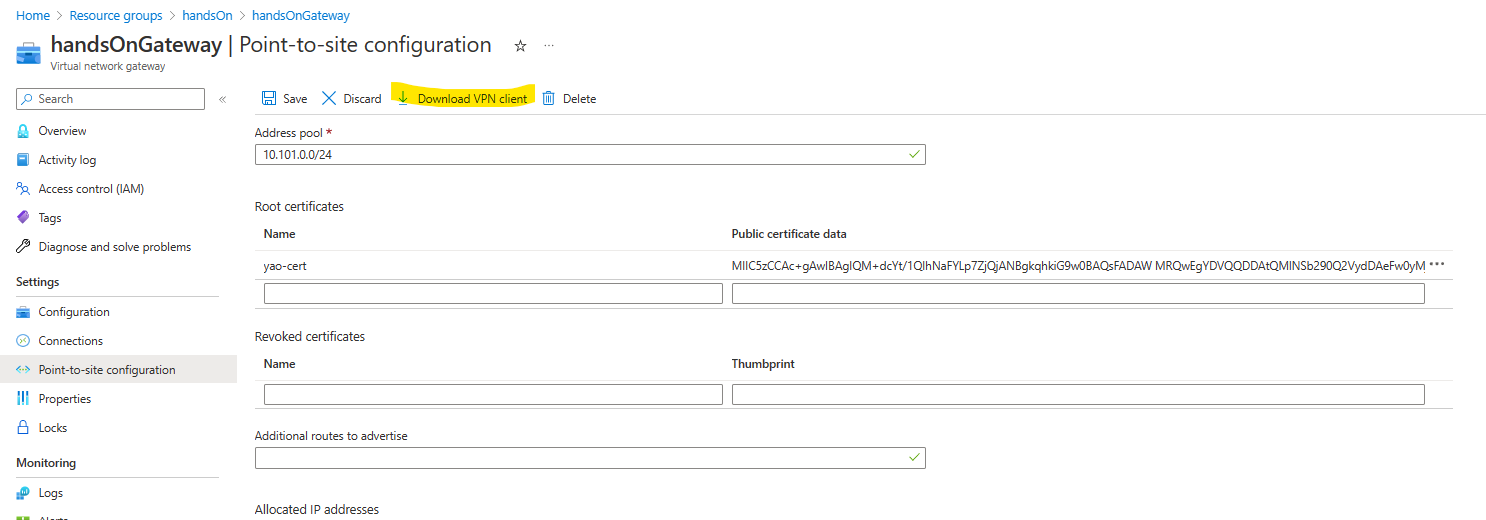
- On the Point-to-site configuration page, in the Address pool box, add the private IP address range that you want to use. VPN clients dynamically receive an IP address from the range that you specify. The minimum subnet mask is 29 bit for active/passive and 28 bit for active/active configuration.
- Open the public key with a text editor and copy the certificate data
- Paste the certificate data into the Public certificate data field.
- Name the certificate.
- Click Save

Download VNP client and install it

